Application & Nail Care
How to Apply Press-On Nails: A Step-by-Step Guide for a Smooth, Secure Fit
Press-on nails can look salon-fresh in minutes, but the final result depends on how well you apply them. The secret is not using more glue or pressing harder. It is choosing the right size, prepping your natural nails properly, placing each press-on at the right angle, and giving the adhesive enough time to set.
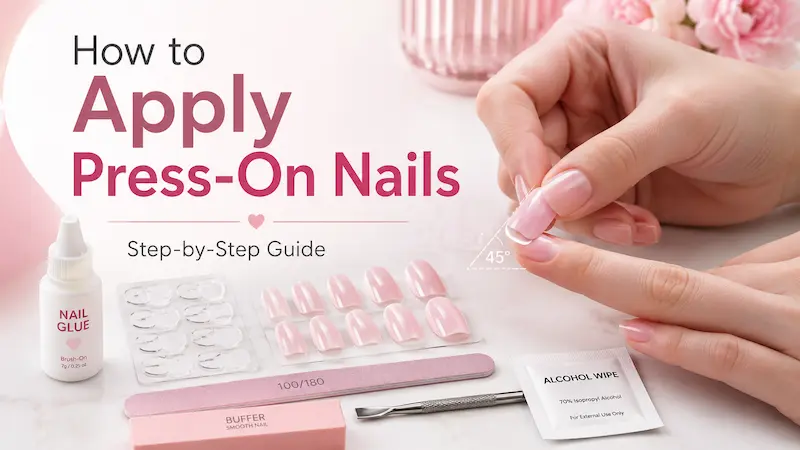
To apply press-on nails, start with clean, dry nails. Match each press-on to your natural nail size, gently push back your cuticles, lightly buff the nail surface, wipe away oil or dust, then apply nail glue or adhesive tabs. Place each press-on close to the cuticle line at a slight angle, press firmly for 20–30 seconds, and avoid water while the adhesive sets.
When done correctly, press-on nails should feel secure, look natural around the cuticle area, and stay smooth without obvious gaps, lifting, or air bubbles.
For a broader overview of press-ons, see our complete guide to press-on nails.
1. Quick Steps: How to Apply Press-On Nails
- Wash and dry your hands completely.
- Match each press-on nail to the correct finger.
- Trim and file your natural nails if needed.
- Gently push back your cuticles.
- Lightly buff the nail surface.
- Wipe each nail with alcohol or nail cleanser.
- Apply nail glue or adhesive tabs.
- Place the press-on near the cuticle at a 45-degree angle.
- Press firmly for 20–30 seconds.
- Avoid water while the adhesive sets.
The full process usually takes about 10–15 minutes. Spending a little extra time on prep can make the difference between press-ons that pop off quickly and press-ons that feel secure for days.
2. What You Need Before Applying Press-On Nails
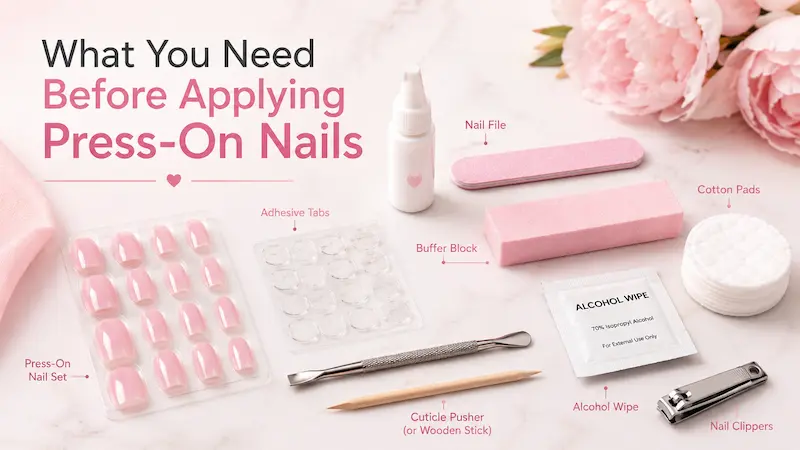
Before you start, lay out everything you need. This keeps the process clean and prevents you from touching your natural nails after you have already removed oil and dust from the surface.
You will need:
- A press-on nail set
- Nail glue or adhesive tabs
- A nail file
- A nail buffer
- A cuticle pusher or wooden stick
- Alcohol wipes or nail cleanser
- Cotton pads
- Nail clippers, if your natural nails need trimming
Some press-on nail kits include most of these tools, but not all kits are the same. If your set only includes the nails and glue, it is still worth using a file, buffer, and alcohol wipe before application. Clean nail prep is one of the biggest factors in how well press-ons stay attached.
Avoid applying cuticle oil, hand cream, or body lotion right before using press-ons. These products can leave a thin layer of oil on the nail plate, making it harder for glue or adhesive tabs to bond properly. Cuticle oil is helpful for nail care, but it should be used after your press-ons are fully applied and set, not before.
For beginners, you can also read more about what comes in a press-on nail kit.
3. Step 1: Choose the Right Size for Each Nail
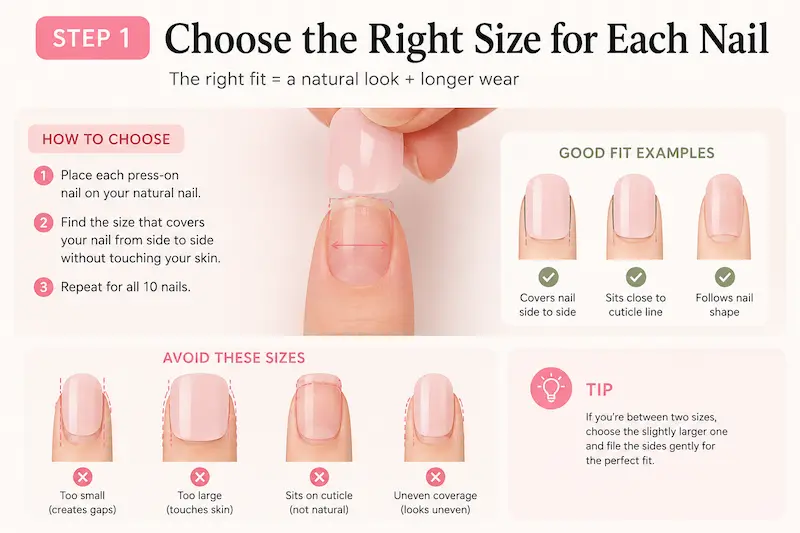
Sizing is the first step, and it matters more than many beginners realize. A press-on nail that is too small can leave the sides of your natural nail exposed and may lift more easily. A press-on nail that is too large can overlap your skin or cuticle area, making the manicure look bulky and increasing the chance of lifting.
Place each press-on over your natural nail before applying any glue or tabs. The press-on should cover your nail from sidewall to sidewall without pressing into the skin. It should sit comfortably over the nail plate and follow the natural shape of your nail bed.
If you are between two sizes, choose the slightly larger nail and gently file the sides until it fits better. This usually gives a more natural result than choosing a nail that is too small.
A good fit should:
- Cover the natural nail without touching the skin
- Sit close to the cuticle line without being placed on top of the cuticle
- Match the width of your nail bed
- Feel comfortable when pressed down
- Avoid large gaps at the sides
Press-on nails should not be pushed under the cuticle or placed directly on top of living skin. Instead, they should sit close to the cuticle line so the manicure looks natural while still staying on the nail plate.
If you often struggle with fit, read our full guide on how to size press-on nails correctly.
4. Step 2: Prep Your Natural Nails
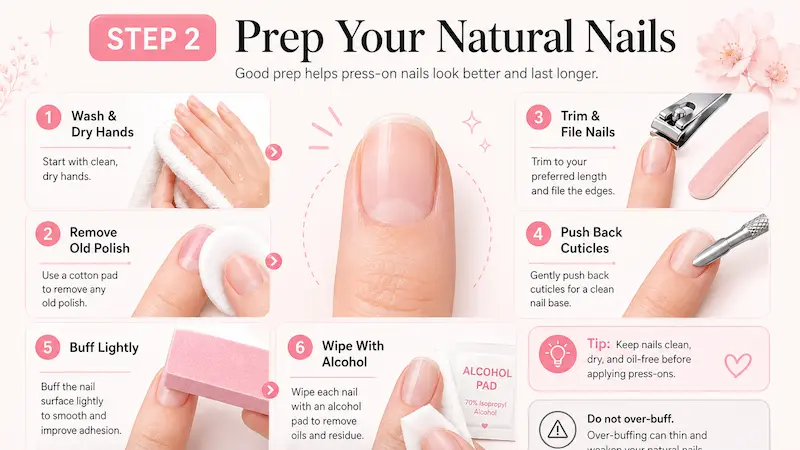
Nail prep is the part most people rush, but it is one of the most important steps in applying press-on nails. Your natural nails naturally collect oil, dust, moisture, and residue from skincare products. If these remain on the nail plate, the glue or adhesive tab may not bond well.
Think of prep as creating a clean, dry surface for the press-on to grip.
4.1. Wash and Dry Your Hands
Start by washing your hands with soap and water. This removes dirt, oil, and surface residue. After washing, dry your hands completely, especially around the nail folds and under the free edge of the nail.
Moisture can weaken the adhesive bond, so do not apply press-ons while your hands are still damp.
4.2. Remove Old Polish or Residue
If you have nail polish, base coat, gel residue, or leftover glue on your natural nails, remove it first. Press-ons apply best on a clean nail surface.
Use a gentle polish remover or nail cleanser, then check each nail for any remaining residue. If old glue is still attached, do not scrape aggressively. Soften and remove it carefully so you do not damage the natural nail surface.
4.3. Trim and File Your Natural Nails
Short to medium natural nails usually work best under press-ons. If your natural nails are too long, they may press against the underside of the fake nail or create an uneven fit.
Trim your nails if needed, then file the edges smooth. You do not need a perfect shape because the press-on will cover the nail, but the natural nail should not have sharp edges or uneven corners.
4.4. Push Back Your Cuticles
Use a cuticle pusher or wooden stick to gently push back the cuticle area. This helps the press-on sit closer to the base of the nail, creating a cleaner and more natural-looking finish.
Be gentle. The goal is not to cut or force the cuticle back. You only want to clear the nail plate so the press-on attaches to the nail, not to skin.
4.5. Lightly Buff the Nail Surface
Use a nail buffer to gently remove shine from the surface of your natural nail. This gives the adhesive a slightly textured surface to grip.
Do not over-buff. You are not trying to thin the nail or make it rough. A few light strokes are enough. Over-buffing can weaken the natural nail and make press-ons less comfortable to wear.
If your nails are weak, peeling, or sensitive, be extra careful and read our guide on whether press-on nails can damage natural nails.
4.6. Wipe Each Nail With Alcohol
After buffing, dust will remain on the nail surface. Wipe each nail with an alcohol pad or nail cleanser to remove dust, oil, and moisture.
This should be the last prep step before applying glue or tabs. After wiping, avoid touching your nail surface with your fingers because skin oils can transfer back onto the nail.
At this point, your nails should be clean, dry, lightly buffed, and ready for application.
5. Step 3: Apply Press-On Nails With Nail Glue
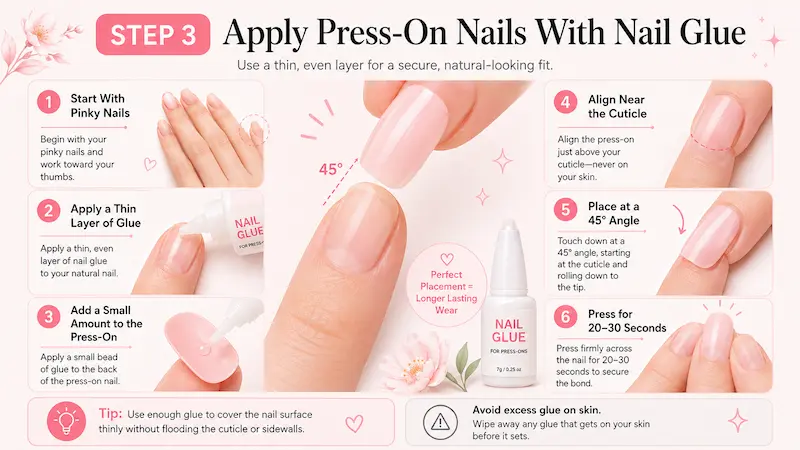
Nail glue is the best option if you want a stronger hold. It works well for everyday wear, vacations, events, or anytime you want your press-on nails to feel more secure.
Before opening the glue, make sure all your press-on nails are already sized and arranged in order. Once glue touches the nail, you will not have much time to adjust the placement.
Start with your pinky nails and leave your thumbs for last. Your thumbs are useful for pressing, adjusting, and cleaning up each nail, so applying them at the end gives you more control.
Apply a thin, even layer of nail glue to your natural nail. You can also place a small amount on the back of the press-on nail, especially near the center where it will contact your nail plate.
You do not need a thick layer. Too much glue can leak onto your skin, make the nail slide around, or create a bulky bond under the press-on. Too little glue can leave empty spaces that lead to lifting or air bubbles.
Keep glue on the nail plate only. Try not to let it touch your cuticles or surrounding skin. If glue gets onto the skin, the press-on may not sit cleanly, and the edge can lift sooner.
Next, hold the press-on slightly above your natural nail. Align the base close to your cuticle line, but do not push it under the cuticle. Place the cuticle side first at a slight angle, then lower the rest of the nail toward the tip.
Once the press-on is in place, press firmly and evenly for 20–30 seconds. Apply pressure from the center of the nail and hold the sides down as well. Do not wiggle the nail while pressing. Movement can weaken the glue bond or shift the nail out of place.
Repeat the process one nail at a time. Do not apply glue to all nails at once because the glue can dry before you place the press-ons.
For a deeper breakdown of glue types and hold time, see our guide to the best nail glue for press-on nails.
6. Step 4: Apply Press-On Nails With Adhesive Tabs
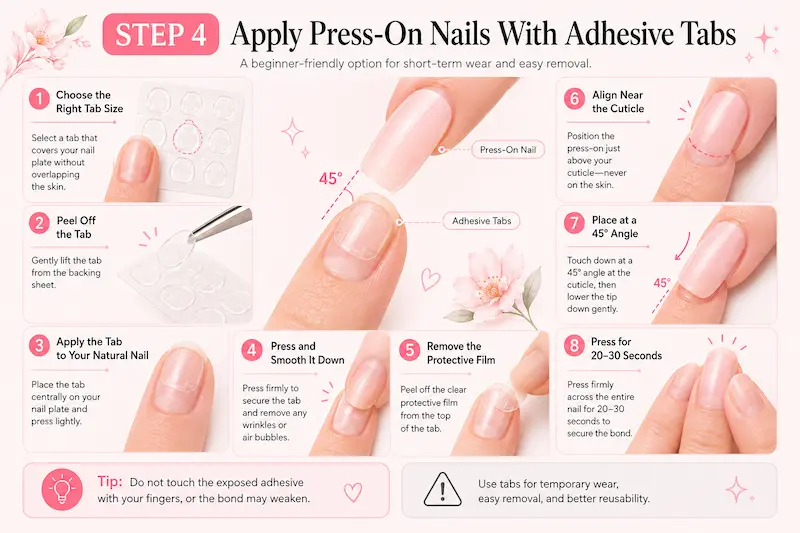
Adhesive tabs are a good option if you want a temporary manicure, easier removal, or a better chance of reusing your press-ons later. They usually do not last as long as glue, but they are beginner-friendly and less messy.
Choose a tab that fits your natural nail without touching the skin. If the tab is too large, it may overlap your cuticle or sidewalls and cause lifting. If it is too small, the press-on may not have enough contact area to stay secure.
Peel the adhesive tab from the sheet and place it directly on your natural nail. Start near the cuticle area, then smooth it toward the tip. Press the tab firmly so it sticks evenly and make sure there are no wrinkles, lifted corners, or trapped air.
Once the tab is smooth and secure, peel off the protective film. Try not to touch the exposed adhesive with your fingers because oil from your skin can weaken the bond.
Align the press-on close to the cuticle line, place it down at a slight angle, and press firmly for 20–30 seconds. With tabs, pressure matters a lot. The more evenly you press, the better the adhesive can grip both the natural nail and the press-on.
Once the set is secure, details such as cuticle placement, sidewall alignment, and finish determine whether it blends with the natural nail. See how to make press-on nails look natural for the complete finishing checklist.
Adhesive tabs are especially helpful if you want to wear a set for a short event or plan to reuse the nails. For more details, see our guide on how to reuse press-on nails.
7. The 45-Degree Angle Method Explained
The 45-degree angle method is one of the most useful tricks for applying press-on nails cleanly. It helps the nail sit closer to the cuticle, reduces air bubbles, and creates a smoother bond between the press-on and your natural nail.
Many beginners place the press-on straight down, almost like putting a lid on a box. The problem is that this can trap air under the nail. Trapped air can create visible bubbles, uneven pressure, and weak spots where lifting may start.
Instead, hold the press-on at a slight angle. Place the cuticle side first, then slowly lower the nail toward the tip while pressing down.
Think of it as a gentle rolling motion:
- Align the base near the cuticle.
- Touch the cuticle-side edge down first.
- Lower the rest of the press-on toward the tip.
- Press firmly from the center outward.
- Hold steady pressure for 20–30 seconds.
You do not need to measure the angle perfectly. “45 degrees” simply means the nail should not be completely flat when you first place it. A slight tilt is enough to make the application smoother.
8. What to Do Right After Applying Press-On Nails
After all nails are applied, give the adhesive time to set. Try to avoid washing dishes, taking a shower, swimming, or soaking your hands immediately after application. You can wash your hands gently if needed, but avoid long exposure to water during the first hour.
Do not apply cuticle oil immediately after application. Oil can soften or weaken the adhesive bond if it reaches the edges before the nails are fully set. Wait until the press-ons feel secure before applying a small amount around the skin.
Also, avoid using your nails as tools. Do not use them to open cans, peel stickers, scrape surfaces, or pry things apart. This matters most in the first few hours, while the adhesive is still settling.
For a full wear-time guide, read how to make press-on nails last longer. If your main concern is water exposure, see can you shower with press-on nails?.
9. Common Application Mistakes to Avoid
Most lifting happens because of sizing, nail prep, glue placement, or pressure during application. Here are the most common mistakes to avoid.
| Mistake | Why It Causes Problems | How to Fix It |
|---|---|---|
| Skipping nail prep | Oil, dust, or moisture weakens the bond | Wash, buff lightly, and wipe with alcohol first |
| Choosing nails too small | The sides do not fully cover the nail bed | Size up and file the sides if needed |
| Choosing nails too large | The press-on overlaps skin and lifts easily | File the sides until it fits the nail plate only |
| Using too much glue | Glue can leak, slide, or create uneven pressure | Use a thin, even layer |
| Using too little glue | Empty spaces can create weak spots | Cover the contact area evenly |
| Pressing straight down | Air can get trapped under the nail | Apply at a slight angle near the cuticle |
| Placing the nail on the cuticle | The edge lifts as the skin moves | Place close to the cuticle, not on top of it |
| Getting hands wet too soon | Water can weaken the adhesive while it sets | Keep nails dry during the first hour |
| Over-buffing | Natural nails can become thin or sensitive | Buff only until the shine is lightly removed |
If your press-ons keep coming off even after careful application, read why press-on nails keep falling off.
10. Glue or Tabs: Which Application Method Should You Use?
Both nail glue and adhesive tabs can work well, but they are not meant for the exact same situation. The best choice depends on how long you want to wear your press-ons, how easy you want removal to be, and whether you plan to reuse the nails.
| Best For | Nail Glue | Adhesive Tabs |
|---|---|---|
| Longer wear | Better choice | Shorter wear |
| One-day wear | Can be too strong | Great choice |
| Beginner-friendly application | Medium | Very easy |
| Stronger hold | Usually stronger | Usually lighter |
| Reusing press-ons | Harder if glue builds up | Easier |
| Quick removal | Requires more care | Easier |
| Water resistance | Better | Lower |
Use nail glue if you want a stronger hold for everyday wear, travel, or longer press-on styles. Use adhesive tabs if you want short-term wear, easier removal, or a better chance of reusing the set.
In most cases, you do not need to use both glue and adhesive tabs together. Using both can create too much thickness under the press-on, making the nail sit higher than it should. For a clean fit, choose one method and apply it correctly.
11. Application Notes for Different Nail Types
Press-on nails can work on many nail types, but the application may need small adjustments.
| Nail Type | Application Note | Helpful Guide |
|---|---|---|
| Short nails | Choose shorter or medium press-ons first to reduce pressure | Short press-on nails ideas |
| Weak or thin nails | Buff lightly and never force removal | Can press-on nails damage natural nails? |
| Wide nail beds | Size up and file the sides for a custom fit | How to size press-on nails correctly |
| Flat nail beds | Avoid press-ons that are too curved for your nail shape | How to size press-on nails correctly |
| Oily nail beds | Clean thoroughly and avoid lotion before applying | How to make press-on nails last longer |
The key is not forcing a press-on to fit. A press-on should sit comfortably on the nail plate without pinching, rocking, or overlapping the skin.
12. Quick Troubleshooting
12.1. What If the Press-On Looks Crooked?
If the glue has not set yet, you may be able to adjust the nail immediately. Move quickly and gently. If the glue has already dried, do not twist, pull, or snap the nail off. Remove it properly, clean the area, and reapply a fresh press-on.
12.2. What If Glue Gets on Your Skin?
If the glue is still wet, wipe it carefully with a clean cotton pad or wooden stick. If it has already dried, do not pick at it aggressively. Soak the area in warm, soapy water and gently loosen the glue over time.
12.3. What If You See Air Bubbles?
Air bubbles usually happen when the press-on is placed straight down, the glue is uneven, or the nail does not fit your natural nail shape well. Apply the nail at a slight angle and press from the base toward the tip to help push air out.
12.4. What If One Nail Pops Off?
Clean both your natural nail and the press-on before reapplying. Remove old glue if needed, lightly buff away rough residue, wipe the natural nail with alcohol, then apply fresh glue or a new adhesive tab.
For a detailed fix, read how to fix a press-on nail that falls off.
12.5. What If the Edges Start Lifting?
Do not pick at lifted edges. Picking can make the lifting worse and may damage your natural nail. If the nail is mostly loose, remove and reapply it instead. For repeated lifting, see why press-on nails lift.
13. FAQs About Applying Press-On Nails
Do You Put Glue on Your Nail or the Press-On?
For a stronger hold, you can apply a thin layer of glue to your natural nail and a small amount to the back of the press-on. The most important thing is to use an even layer and avoid flooding the cuticle or skin.
Should Press-On Nails Go Under the Cuticle?
No. Press-on nails should sit close to the cuticle line, but not under the cuticle or on top of living skin. Placing them too far back can cause lifting, discomfort, or a messy glue line.
How Long Should You Press Press-On Nails?
Hold each press-on firmly for about 20–30 seconds. Use steady pressure and avoid wiggling the nail while the glue or adhesive tab sets.
Should You Buff Your Nails Before Press-Ons?
Yes, but only lightly. Buffing removes shine and helps the adhesive grip better. Do not over-buff, because thinning the nail can make it weaker and more sensitive.
Can You Apply Press-Ons Without Glue?
Yes. You can use adhesive tabs instead of glue. Tabs are easier to apply and remove, but they usually do not last as long as nail glue.
Why Do My Press-Ons Get Air Bubbles?
Air bubbles can happen when the nail is placed straight down, the glue is uneven, or the press-on does not fit your nail shape well. Applying the nail at a slight angle near the cuticle can help push air out.
Can I Wash My Hands After Applying Press-Ons?
You can wash your hands gently if needed, but avoid soaking your nails right after application. For the best hold, keep your hands dry during the first hour and avoid long water exposure for the first few hours.
Can I Reuse Press-Ons After Applying Them With Glue?
Sometimes, but glue can leave buildup on the back of the press-on. Adhesive tabs are usually better if you want to reuse your nails. If you use glue, remove the nails carefully and clean off residue before storing them.
For safe removal, read how to remove press-on nails without damage.
Final Thoughts
Applying press-on nails is simple once you understand the order: size first, prep carefully, choose the right adhesive, place each nail at a slight angle, and press firmly while the bond sets.
The most natural-looking and secure press-on manicures usually come from small details: a clean nail surface, a good fit around the sidewalls, light buffing, careful glue placement, and enough pressure during application.
Nail glue is best when you want a stronger hold. Adhesive tabs are best when you want easier removal or short-term wear. Whichever method you choose, avoid rushing the prep stage and never force a press-on that does not fit your natural nail shape.
When applied correctly, press-on nails can give you a polished manicure at home without needing a salon appointment.